Manicure Monday: Bring on the Spring! +Born Pretty Introduction

Hello my bunnies!

I apologize for the hiatus notice I posted 2 weeks ago. :\ My blog is still missing pictures here and there...but I'm going to just keep moving forward! So thank you to everyone who is still supporting me after all this time. ^_^ I love you guys!

Today I finally have another Manicure Monday tutorial for you all featuring products from the ever so popular, BornPrettyStore!


Cute neh?

Before I begin the tutorial on how I achieved this manicure, I'm first going to introduce the online shop BornPrettyStore!


BornPrettyStore specializes in selling nail art products, as well as makeup, jewelry and accessories. They have a variety of different products to choose from and all of the products sold are super cute and cheap! They offer Free Shipping Worldwide and the people running the store are so nice! Daisy and Rita are quick to answer emails about questions you have, and they are super nice and easy to talk to. :)


You can use my coupon code, ANB10 for 10% off your next purchase at BornPrettyStore!
Trust me....once you go on that site...you'll want to buy something x3

I've already purchased from them twice before! And I'll get onto reviewing the products once my second shipment comes in, hopefully this week~ ^_^

But nevertheless, let's get into the Manicure Monday of today's post!


These are the products I received from Rita of BornPretty! All of them are nail art products, so expect a lot of nail art posts in the upcoming weeks~ <3 They're all so pretty and I'm super excited to decorate my nails every week!

Here are the links to the these three products!

~http://www.bornprettystore.com/sheet-nail-stickers-chinese-painting-blue-flower-series-nail-decoration-p-8206.html

~http://www.bornprettystore.com/2pcs-rhinestone-crystal-crown-heart-dangle-nail-decoration-p-11982.html

~http://www.bornprettystore.com/200pcs-punk-metal-heart-round-square-star-drop-stud-rhinestones-nail-decoration-wbox-sale-p-7277.html

For today's manicure I'm using this little guy right here.


The 200 piece rhinestone kit! {Which you can buy here}

It contains rhinestones shaped in hearts, diamonds, squares, teardrops, stars and circles in both gold and silver.


And the best part is...it only costs $4.29 for all 200 pieces! So cheap!! You can make a LOT of different nail designs with this wheel so expect a lot of Manicure Monday's using these rhinestones<3


For this design I used these gold square rhinestones~ They were super easy to use and I have plenty left over to make other, more creative nail art with them!


So let's get onto the tutorial on how to make the flowers of this design!


These are the polishes I used:

~ Jordana Base and Topcoat
~ Sinful Colors in Snow Me White
~ Sinful Shine with Gel Tech in Come Hither
~ Sinful Colors in Light Pink
~ Etude House Ice Cream Nails in GR701
~ Sally Hansen Extreme Wear in 34 Going Green


Start off with the base coat to protect your natural nail


Use a white polish and paint 1 - 2 coats on each nail.

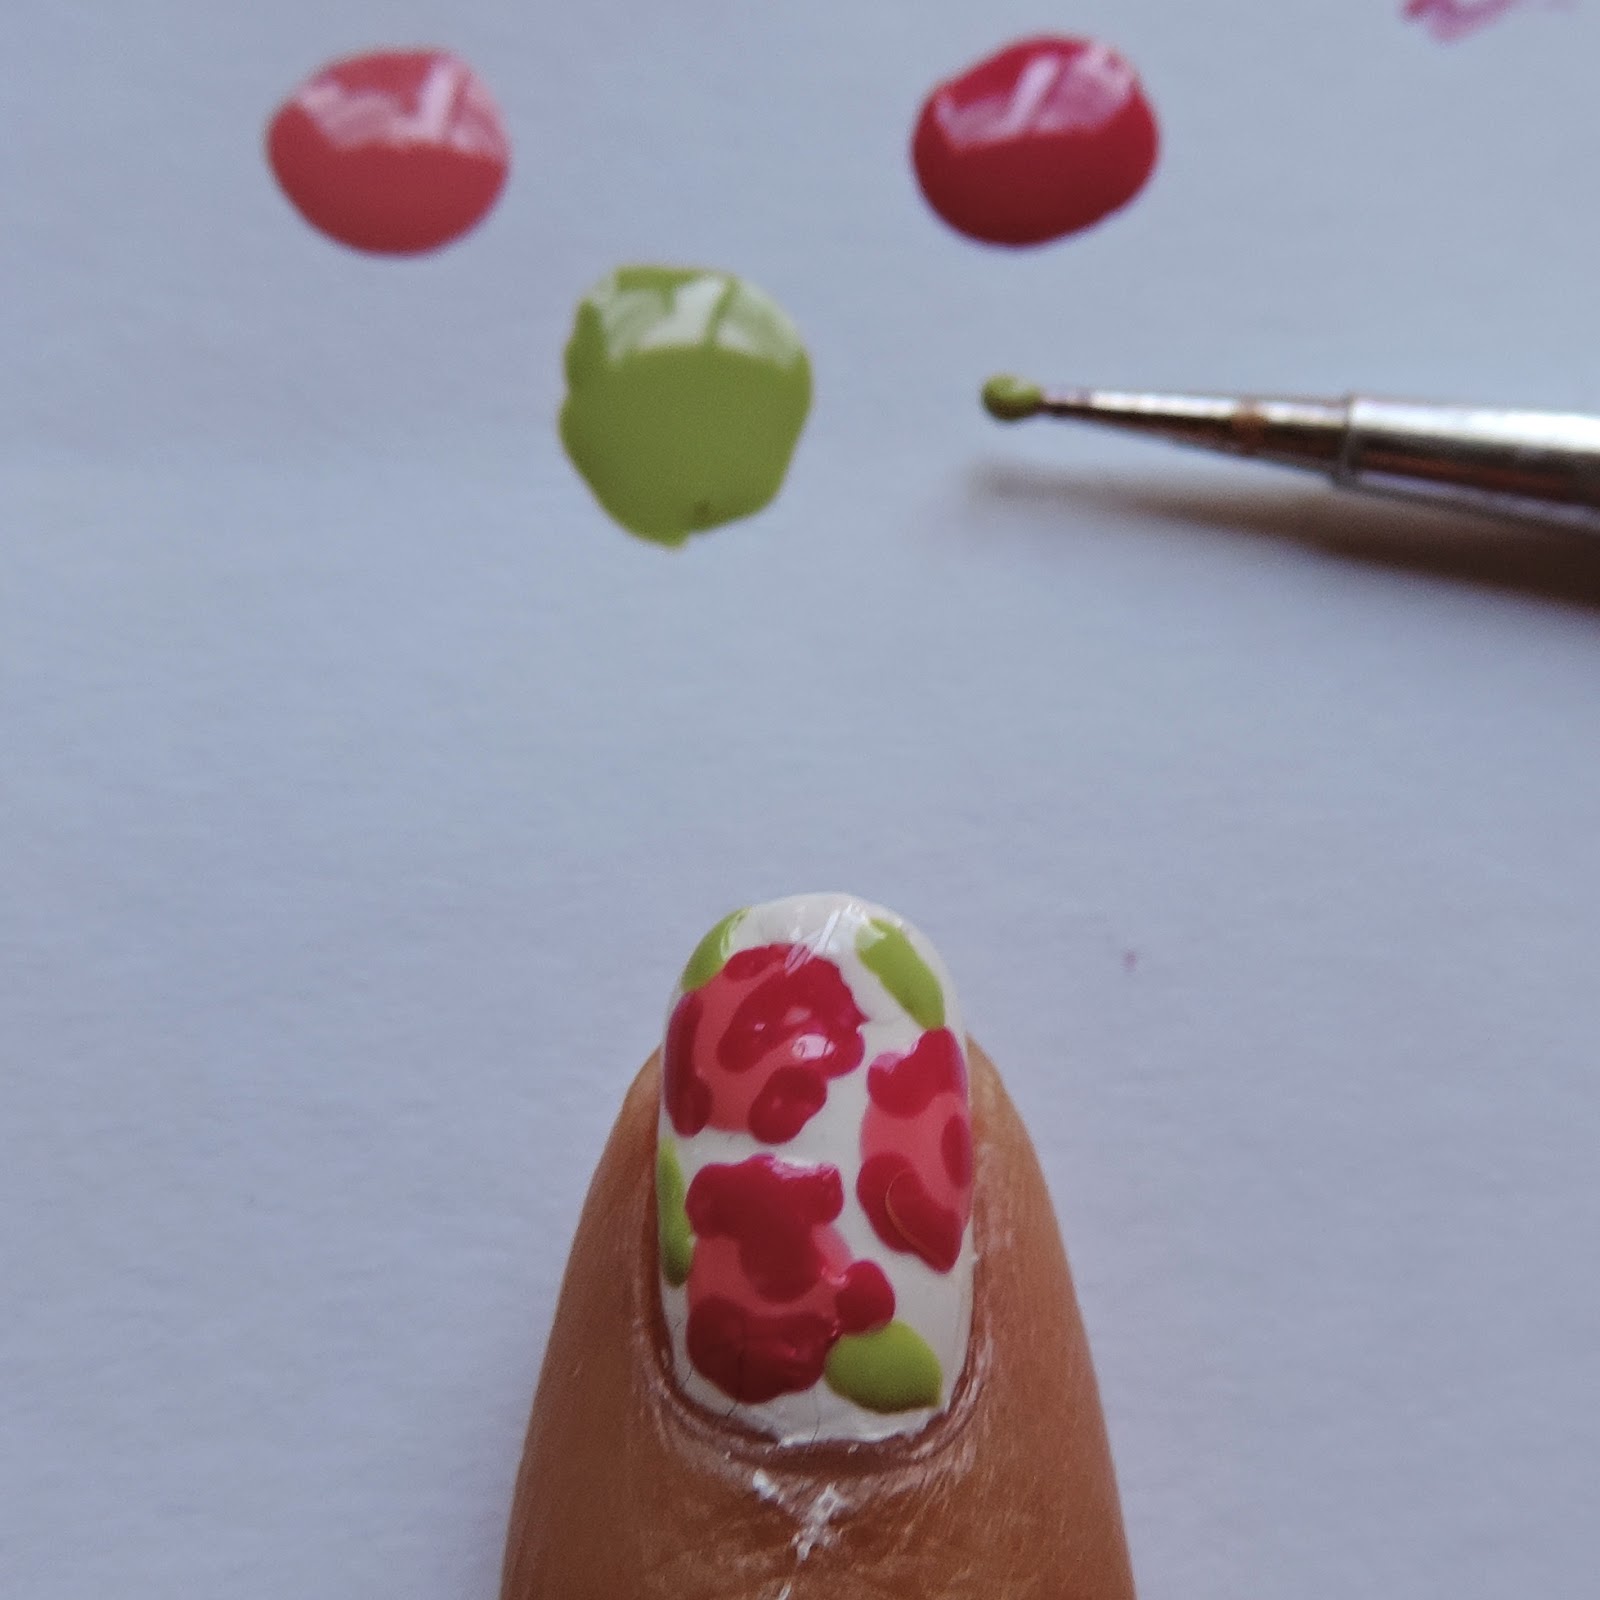
 Use the lighter pink and with a dotting tool, make 2 - 3 dots on your nail


Use the darker pink and with a smaller dotting tool or toothpick, trace the outline of the lighter pink dot, but don't connect the lines together. Put a dot in the center of the lighter pink dot. 


To make the leaves, using the same smaller dotting tool or toothpick, use the lighter green color and make a line, outside of the rose. 

{Unfortunately I didn't take a picture for the darker green color, but you just place a small strip of the darker green onto the light green leaf you just made to give the leaves more dimension}

Last step is to Seal with a top coat!


And there you have it!

To make the rhinestone accent nail, just apply the white polish, put on a clear coat and place 4 - 5 rhinestones down the middle of the nail. Seal with topcoat. 

And that's about it~

I hope you guys liked this Manicure Monday!


And please use my coupon code, ANB10 for 10% off your next purchase at BornPrettyStore!

Until next time,
Be true and always be you, 
chocobunnii13
Follow me or come talk to me at:
Instagram | Twitter | Facebook | Tumblr
Add me on Snapchat: chocobunnii13

Review: Etude House XOXO Minnie Touch Blusher

hello hello~

I keep apologizing to you guys for not updating my blog >.< Uni life can be so hard sometimes. :( But nevertheless, I have a short little review for you guys on this little baby right here:

Etude House XOXO Minnie Touch Blusher~

I know guys...don't be harsh. I'm a bit late in reviewing this little baby, but it's alright~ It is a blusher that will give you the cuteness of Minnie Mouse~ And I absolutely love the packaging of this Etude House x Minnie Collection blusher~ It is in a cute pink box with Minnie's signature bow on it, and a bunch of hearts and cute sayings~ kyaaa~ <3


So the back of the box is it's directions.

This is a multi blusher that flushes cheeks for a lovely Minnie look.

{Directions} Pick up blusher by gently sweeping brush across Minnie's face and apply onto cheeks.

Simple enough directions, so let's just get into the actual product!


{I do apologize for not taking pictures of the product before using it...I got excited too quickly...}


But ta da! As you guys can {hopefully} see, the blush is in the face of Minnie Mouse! I think the product itself is the most cutest makeup product I've ever owned. Just look at it!! I wish Minnie's face would stay on forever, but as you guys can already tell, her face will disappear after 2-3 uses. :(

The compact itself, is cute as well~ It is polka dots with a sexycough image of Minnie on the cover~ Unfortunately it does not come with a mirror... >.< So it's just the blusher inside.

Minnie's face contains 3 shades.

 A) Peach, B) Pink, and C) Lavender


 {Swatches: From left to right -- Peach, Pink, Lavender, All 3}

The colors are bright and pastel. I think when mixed together, the colors are a perfect match with each other.


{Left: No Blush, Right: Blush}

I'm not too sure if you guys can see the difference this blush made to my cheeks...but this blusher gives a soft flush of pink. It's really subtle, making it appear natural on my skin. For some, it may be too sheer of an application, but for me I like the effect it gives my cheeks. When I wear it, I just feel more girly and kawaii~ ^_^

The only downside of this blush is its fallout and how chalky it is when used. So. Much. Powder. >.< And it doesn't last that long on your cheeks. Possibly 3-4 hours at most. Since the blusher is a bit on the light side pertaining to color, it also only matches those with lighter toned skin. My skin is borderline tan, so it looks slighly off, but because I use powder that is lighter than my skin tone, it blends in quite nicely.

Also, this product is really delicate. I read a lot of reviews where shipping caused this product to crack and break during transportation. Many bloggers received their blusher and/or highlighter duo broken and crushed into powder, even when it was wrapped up and shipped really nicely. So please be careful and buy from a trusted website that would refund and/or give you a new product in exchange. :)

OVERALL RATING:

4/5

I definitely would use this for an everyday sort of blush. It gives me that perfect flush on my cheeks in the morning and I love it's cute packaging. I wish it wasn't that powdery, but I guess I can live with the chalkyness. It lasts about 3-4 hours on my cheeks, which is fine by me, however I do wish it'd last longer. It would be convenient if it also had a mirror, but I can live without one too.  A lot of improvements could be made to make this blush a lot better, but it works for an everyday, natural flusher for the cheeks. I think it'd be a good product for beginners who are just being introduced to blushers. :)

 So thank you guys for reading this short little blog post! HUGE thanks to Lee Ji Eun for providing me with all of these wonderful products I've been reviewing recently! <3

 Please please please check out Cosmetic.Jolse!
{The Blusher is currently sold out :( As well as it's sister, Minnie Touch Highlighter however, look at their other Etude House Minnie Products!}

Until next time,
Be true and always be you, 
chocobunnii13
Follow me or come talk to me at:
Instagram | Twitter | Facebook | Tumblr
Add me on Snapchat: chocobunnii13

PS: I'm thinking of changing up my blog a lot; meaning changing the URL, template, and blog content...so stay prepared in the next few months! 

PPS: Also planning a giveaway once I reach 200 GFC friends~ :D Thank you for the 100 Bloglovin' friends too! 私は皆さんを大好き!

Latest Instagrams

© be true and be you. Design by Fearne.